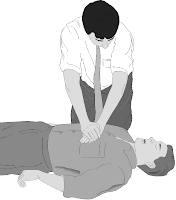
 CPR is a lifesaving procedure used on individuals who are not breathing and have no pulse. This procedure can keep oxygenated blood flowing to the brain and organs until medical treatments can restore a normal heart beat. CPR can be used during many emergencies, including suffocation and heart attack.
Background
These are the steps that trained professionals use when performing CPR on an adult. For those who are untrained, perform hands-only CPR (described in more detail below). To learn CPR properly, there are first-aid training courses available. When performing CPR an importa
 nt acronym to remember is ABC, which stands for airway, breathing and circulation.
WARNING: CPR that is done incorrectly can cause serious injury. Do not perform CPR unless:
1. The person has stopped breathing
2. The person has no signs of circulation
3. No one with more CPR training is available
Equipment and Supplies
-Telephone
Instructions
1. Start by checking to see if the person is conscious, if they appear to be unconscious shake them gently and ask “Are you okay?”
2. If the person is not responding call 911.
NOTE: This image demonstrates the
difference between a blocked airway
and an open airway. See Figure 1.
 Figure 1: Blocked and Open Airway
 Figure 2: Position of the head to open the airway
NOTE:If the person is not breathing and you are trained in CPR, begin rescue breathing. If you are NOT trained in CPR, skip rescue breathing and move onto chest compressions to restore circulation.
 Figure 3: Rescue breathing
NOTE: If there are NO signs of circulation begin chest compressions to restore circulation. If there are signs of circulation, continue to give rescue breaths until medical personnel arrive.
 Figure 4: Position of your hands on the person's chest
9. Using your body weight push down on the chest. Each push should go straight down approximately 5 cm. Give 15 compressions. See Figure 5.
 Figure 5: Chest compressions
10. After 15 compressions, give two rescue breaths. Repeat the 15 compressions/ 2 rescue breaths 4 times.
11. Continue chest compressions until there are signs of movement or until emergency personnel can take over.
Conclusion
CPR can ultimately save a life by restoring the person’s breathing and circulation. The success of CPR depends on how quickly CPR is administered and the person’s medical issues. It is important to give CPR as quickly as possible because when a person goes without oxygen it can result in permanent brain damage or death.
The following link provides valuable information on administering CPR as well as many other related articles: http://www.nlm.nih.gov/medlineplus/cpr.html